Optical alignment using the Point Source Microscope
Robert E. Parks and William P. Kuhn
Optical Perspectives Group, LLC, 9181 E. Ocotillo Drive, Tucson, AZ 85749
ABSTRACT
We give an example of a Point Source Microscope (PSM) and describe its uses as an aid in the alignment of optical systems including the referencing of optical to mechanical datums. The PSM is a small package (about 100x150x30 mm), including a point source of light, beam splitter, microscope objective and digital CCD camera to detect the reflected light spot. A software package in conjunction with a computer video display locates the return image in three degrees of freedom relative to an electronic spatial reference point. The PSM also includes a Köhler illumination source so it may be used as a portable microscope for ordinary imaging and the microscope can be zoomed under computer control. For added convenience, the laser diode point source can be made quite bright to facilitate initial alignment under typical laboratory lighting conditions. The PSM is particularly useful in aligning optical systems that do not have circular symmetry or are distributed in space such as off-axis systems. The PSM is also useful for referencing the centers of curvatures of optical surfaces to mechanical datums of the structure in which the optics are mounted. By removing the microscope objective the PSM can be used as an electronic autocollimator because of the infinite conjugate optical design.
Keywords: Optical alignment, optical testing, optical test instrumentation, microscope, autocollimator, software
1. INTRODUCTION
In the last decade or two the optics community has seen huge strides made in the improvement of optical image quality due to the widespread availability of phase-measuring quantitative-interferometry. Surface topography data from phase measuring interferometers is now commonly used by fine figuring processes such as ion milling1, MRF2 and other computer controlled polishing methods to produce optical surfaces accurate to a few nanometers peak-to-valley. A few decades ago one would have asked “Why do you want surface figure this good?” With the luxury of hindsight we see that some of the applications for highly precise figure include the optics that corrected the error in the Hubble Space Telescope and the ever increasing demands of the semiconductor industry.
With an eye on the past it is clear that if another significant improvement in overall optical quality could be made in optical systems there would be applications waiting for those improvements. However, it is probably unrealistic to assume that the optical figure quality of surfaces can be made much better, or at least better at an affordable cost. On the other hand there is an area where significant improvements can be made; the alignment of the surfaces within an optical system to one another. The same sorts of optical performance improvement that have been made in figure can be achieved by the alignment of optical components to tighter tolerances. What is needed to accomplish this are the tools, and a new way of thinking about achieving better alignment.
There are at least three reasons to think that improvements could be made in alignment. The majority of optical systems are getting smaller which means the absolute tolerances are getting tighter. As the optical tolerances get tighter, the tolerances on mating features of cell and lens get tighter and become prohibitively expensive to manufacture. Finally, using the periphery and seat of an optical element to control centering is operating at the optically insensitive end of the optical lever arm. Optics should be centered based on aligning their centers of curvature directly, again for at least two reasons. The edges and seats of lenses and cells have a poor finish relative to the optical surfaces and it is difficult to impossible to control a tolerance to better than the finish of the part. An optical surface is fabricated well enough to produce a return spot a few microns in diameter at its center of curvature. These spots can be located to a small fraction of their diameter in space and provide the information to align centers of curvature coaxially, or in three dimensional space, to a micron or so.
In this paper we will describe the Point Source Microscope (PSM) 3, an instrument for locating the centers of curvature of optical surfaces to micron accuracy for alignment of optical elements that is analogous to the use of a phase measuring interferometer to provide information used to guide the figuring of optical components. Once the location of the center of curvature of an optical surface is known it is easy to position that center on the optical axis of the system in analogy to what ion milling or MRF can do for surface figure.
First we will describe the PSM and explain of how it works along with the companion PSM Align©4 software. Then we give several examples of how the PSM is used to align various types of optical systems using contrasting alignment techniques. Finally we will discuss how the PSM compares with other commercially available alignment instruments.
2. DESCRIPTION OF THE PSM
2.1 PSM hardware
The PSM is a video metallographic, or reflected illumination, microscope with a Köhler light source to provide uniform illumination over the field of view. In addition, the PSM has a point source of illumination produced by the end of a fiber pigtailed laser diode that is conjugate to the microscope object surface as shown in Fig. 1 below.
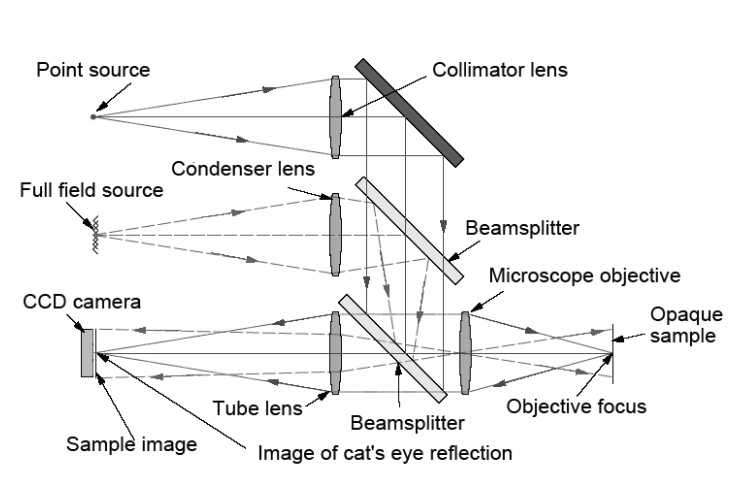
Fig. 1 Light paths in the PSM showing the two sources of illumination and the cat’s eye reflection produced by the point source
Both light sources are controlled though the companion computer by the PSM Align© software and may be used one at a time or simultaneously as well as adjusted in intensity. The diffuse, Köhler illumination is used for metallographic imaging of opaque surfaces while the point source produces a cat’s eye retro-reflection from a surface at the microscope objective focus that produces a bright spot on a dark background on the video screen as seen in Fig. 2 (middle).

Fig. 2 LED array in a 5x microphotograph using Köhler illumination only (left), point source only off a rough surface causing distortion of the retro-reflected spot and a software generated reference crosshair (middle), and both sources of illumination on the printing of a business card showing the retro-reflection from a non-specular surface (right). All images made with Nikon objectives5.
Both sources can be used simultaneously as shown in the right-hand image in Fig. 2. Because the point source produces a retro-reflection, its centroid will always appear in the same pixel location on the video screen but its size (and shape, if the surface is rough) will vary depending on how well the microscope is focused on the surface. A crosshair (Fig. 2, middle) can be aligned to the retro-reflected spot so that if the point source is turned off the location in the image plane where it would appear is known. The PSM could be used with an external fiber source to illuminate a particular pixel location on a surface with an alternative wavelength of light if this were useful. The point source is also useful when trying to image a transparent surface with virtually no defects on which to focus. When the surface is in focus there will be a bright return from the point source retro-reflection even though no other surface detail may be visible in the image.
2.2 PSM Align© software
The video image is captured with a 1/3” format Point Grey Flea Firewire camera6 with a 1024×760 pixel, 12 bit CCD array of which 8 bits are currently used. The captured image is processed with the PSM Align© software to derive image statistics and reference locations. Figure 3 shows the user interface for the software that includes the control panel, a National Instruments IMAQ7 cursor toolbox, the main video window and a binary video window to aid in adjusting image thresholds.
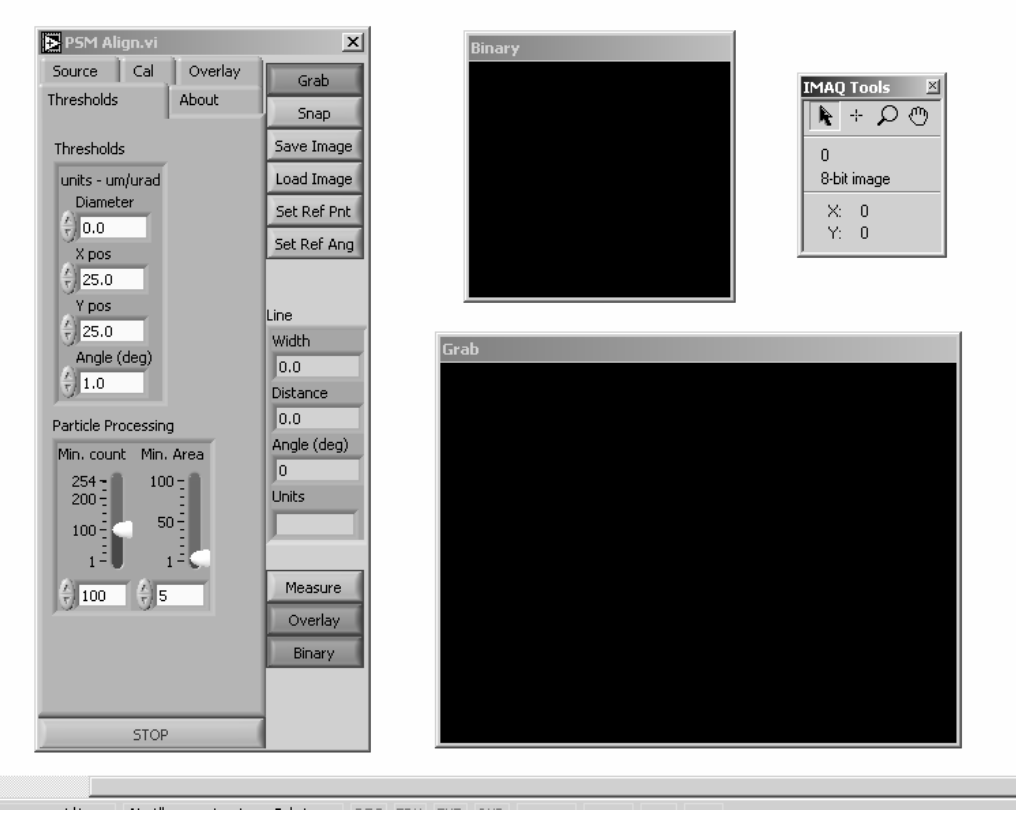
Fig. 3 The four PSM Align© user interface windows as they appear simultaneously on the monitor screen. The windows may be positioned arbitrarily by the user.
When the cursor is positioned over a particular pixel, the IMAQ toolbox gives the x and y pixel location and the 8-bit intensity (gray value). These tools also allow zoom and un-zoom centered on the cursor position. The PSM Align© “Thresholds” tab illustrated is used to set the thresholds in the binary video window and include intensity and adjacent pixel areas as well as geometrical parameters. The control panel also manages the camera shutter and gain, image snap, save and load, image feature size and location relative to a settable reference crosshair location. The illumination source and intensity are also set here. This completes a brief summary of the hardware and software features of the PSM. The balance of the paper illustrates how these features are used in various alignment applications.
3. ALIGNMENT APPLICATIONS
3.1 Alignment of the PSM with a sphere
We have described how the PSM produces a retro-reflected spot when focused on a surface. When the PSM objective focus is at the center of curvature of a concave sphere, light will be reflected from the sphere at normal incidence and produce a focused spot at the PSM objective focus. The same is true for a convex sphere whose radius of curvature is limited by the working distance of the objective. The PSM then relays this spot back to the CCD detector as shown in Fig. 4. The difference between this point image and the retro-reflected spot is that the spot image from the center of curvature is sensitive to the lateral alignment of the PSM to the center of curvature as well as to focus.

Fig. 4 PSM objective focus at the exact center of curvature of a concave sphere (left) and displaced laterally and in focus (right)
As can be seen in the right half of Fig. 4, if the PSM objective focus is not coincident with the center of curvature of the sphere the return image will neither be centered on the out-going focus nor well focused. Consequently, the return spot centroid will be shifted laterally on the CCD array and be out-of-focus. With any practically useful microscope objective (5x to 50x and sufficient numerical aperture) the PSM has 1 μm or less lateral sensitivity when used in conjunction with the PSM Align© software and a focus sensitivity of about 1 μm when used with a 20x or 50x objective
The PSM can equally well be used with convex spheres, the only requirement is that the radius of the sphere is less than the working distance of the objective, or that an auxiliary lens is used to create a long working distance as will be illustrated in the example of the doublet below. Because the PSM can be used with convex spheres and cylinders many kinds of mechanical tooling hardware become practical and useful optical alignment tooling. Some examples of this tooling are shown in Fig. 5. Surprisingly, these mechanical spheres and cylinders are very accurate figure-wise and are inexpensive compared to most optical hardware. CERBECTM silicon nitride balls8 are rounder and have better finish than the best chrome steel balls plus are opaque and approximately match the reflectivity of bare glass.
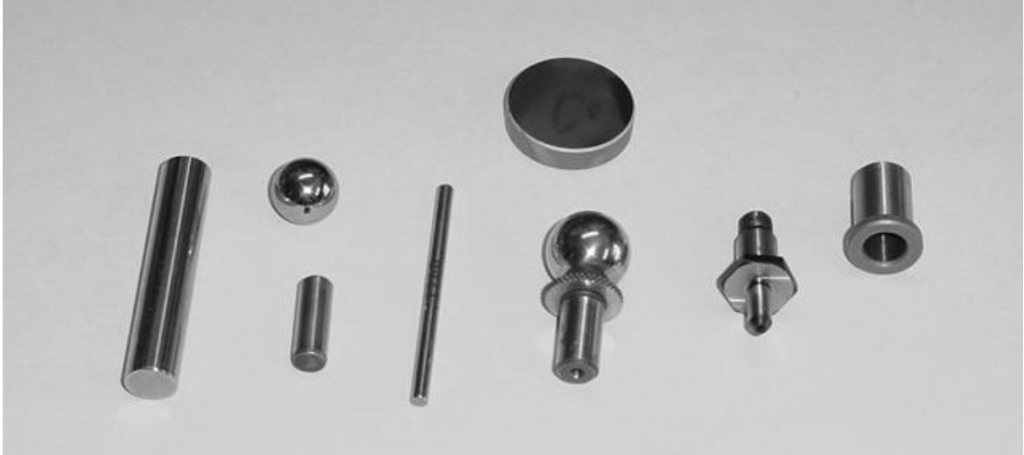
Fig. 5 Mechanical tooling hardware including cylinders (plug gauges and locating pins), spheres (bearing balls and tooling balls), and plane mirrors (gauge block target mirrors).
It may not be obvious at first sight, but cylindrical tooling such as plug gauges are as useful with the PSM as balls for alignment purposes; instead of the center of a ball or sphere producing a point image, the axis of a cylindrical object produces a line image. Again, the cylinder establishes three degrees of freedom just as a ball. Rather than three translational degrees of freedom defined by two lateral motions and focus, the cylinder can be located by one lateral position perpendicular to its axis, another translation indicated by best focus of the line and a third by the angle the line makes with respect the coordinate system. The PSM Align© software calculates these two translations and the angle just as it does the three translations for the ball or sphere. The lateral and focus sensitivities are the same as for the ball and the angular sensitivity is about 5 seconds.
Finally, it should be noted that the PSM also works as an electronic autocollimator when the objective is removed and that is why we have shown the gauge block target mirror among the tooling in Fig. 5. A collimated 6.5 mm diameter Gaussian beam exits the PSM with no objective, is reflected by a plane specular surface and is focused on the CCD detector by the internal tube lens. In the autocollimator mode the angular sensitivity is better than 5 seconds.
3.2 Alignment of a simple doublet lens
This example is given to show how the PSM can be used for alignment in cementing a simple doublet. The optical parameters of this example are such that adequate performance does not require precision alignment; however it is a convenient example to illustrate some of the principles of the PSM. The technique also shows the power of using rotary tables for centering systems with rotational symmetry.
Mindful of the background in Sec. 3.1 on using the PSM at the center of curvature, consider cementing an f/5 doublet objective. Assume the flint is sitting on a cup on a precision rotary table, the surface to be cemented facing up as shown in Fig. 6 (left). This element has been centered with the PSM so that the reflected images from both surfaces are stationary as the table is rotated. The rear (flatter) surface is viewed through the upper surface via an auxiliary lens to converge the light enough to get convergence of the reflected light, in other words, to give the PSM a long working distance to get at the apparent center of curvature. A lens design program is used to find the correct conjugates and, in general, there will be spherical aberration in the return image. If the spherical aberration is objectionably large, the aperture of the lens can be stopped down to the limit where diffraction begins to make the spot larger rather than smaller. The upper surface can be viewed directly at its center of curvature.
A procedure to accomplish this centering is to move the cup laterally until the reflection from the rear surface is stationary. A 1 μm decenter of the lower surface will produce a 2 μm decenter of the reflected image for a total motion of 4 μm when the table is rotated. When the reflection from the lower surface is stationary, slide the lens on the cup until the reflected image from the directly accessible upper surface is stationary as the table is rotated. This procedure should be repeated to be sure that centering the upper surface has not affected the centering of the lower. It is easy to see that the flint element can be centered to better than 1 μm given the PSM sensitivity of 1 μm although there is no need for such accuracy with a relatively slow doublet used in the visible.
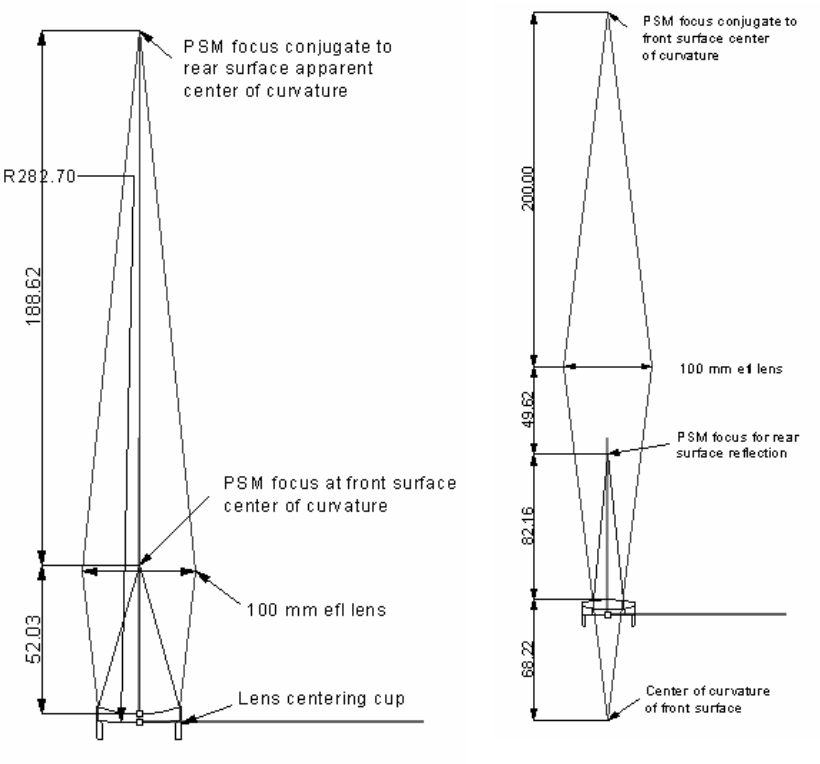
Fig. 6 Centering the flint half of a doublet using the PSM and a precision rotary table (left) and centering the crown to the flint (right)
With the flint centered, a drop of cement is placed in the concavity and the mating crown element set in place. Once the cement has been reduced to an appropriate thickness, the crown element may be centered by either of two methods, see Fig. 6 (right). The auxiliary lens may be used to view the center of curvature of the convex surface directly or the PSM can view the reflection off the rear of the flint as seen through the crown. Both methods have similar sensitivity using the parameters of this example but looking directly at the center of curvature is most sensitive. In either case, a 0.01o tilt of the front surface produces a 15 μm or more decenter of the spot that is doubled by rotating the table. If one were to use a contact indicator at the edge of the upper surface, this same tilt would register a 5 μm total indicated runout.
As was explained at the beginning of this section, this example illustrates how to use the PSM for cementing a doublet even though the optical parameters do not warrant this degree of precision and accuracy. There are cases not substantially different from this example for wide field of view projection systems or very fast imaging lenses used in the visible where these sort of centering tolerances are necessary to obtain the desired lens performance. The next example is one where the alignment accuracy is definitely needed.
3.3 Alignment of an Offner relay mirror system
In an example where the need for micron alignment is truly required, consider the Offner9 relay shown below in Fig 8a. Because this is an all reflective system it can be used at a 13.5 nm wavelength in the soft X-ray region and now precision alignment becomes a necessity. The question is how to assemble the two spherical mirrors as well as possible to the mechanical hardware that position the relay optics relative to the rest of the lithography system.
In the example Offner relay used, the total field is about 90 μm in width, the distance from the object plane to the primary is 250 mm and the object is 40 mm off the axis of symmetry. Given this design, Fig. 7 shows the effect decentering or despacing have on performance. Not unexpectedly, performance at the edge of the field is worse than the center but also the image plane is tilted. Knowing the tilt would allow compensating or correcting for the error. Clearly the biggest loss in performance is despace but this can also be corrected by an axial shift in the image plane.
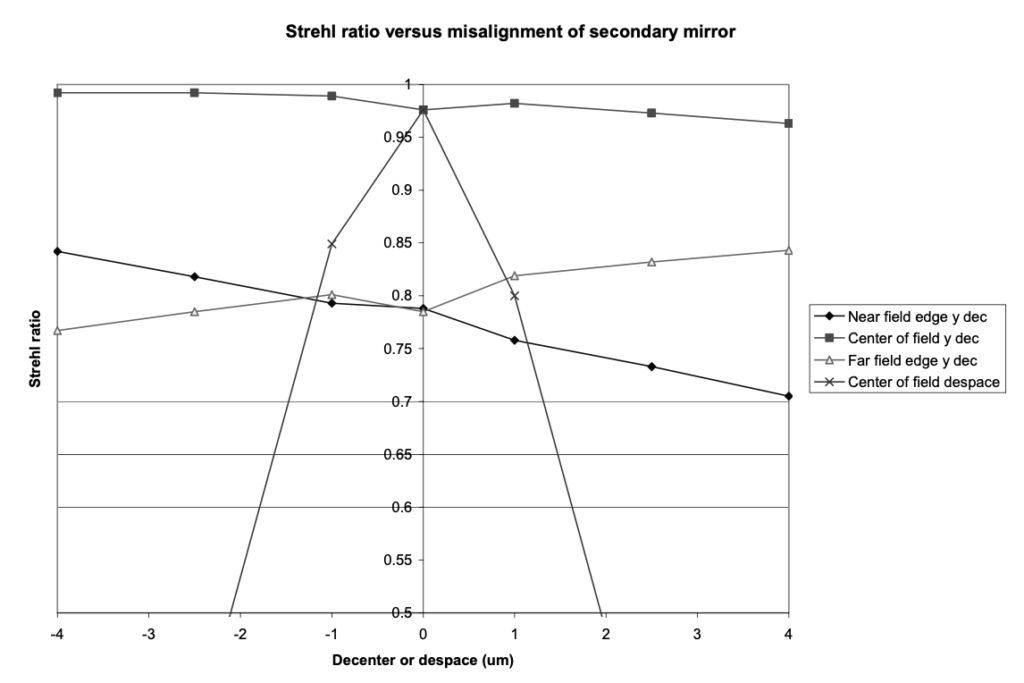
Fig. 7 The effect of decenter or despace on the Strehl ratio of the Offner 1:1 relay in the example
The PSM is particularly useful if some thought to alignment has been made in the initial system opto-mechanical design by incorporating features such as tooling balls to locate critical datums. Assuming critical datums have been defined mechanically, we start the alignment by placing a ball where the two mirrors have their common centers of curvature.
Next, using an auxiliary lens with a focal length slightly longer than the radius of curvature of the secondary mirror, align the PSM focus conjugate with the center of the ball in three directions so that the return image is centered and in focus in the PSM image. Then insert the secondary mirror and align it to the PSM image using the reflection from the secondary convex surface that is conjugate to its center of curvature as in Fig. 8b.
Move the PSM so it faces the primary mirror and align the PSM focus to the center of the ball as in Fig. 8c. Remove the ball and align the primary to the PSM focus so light reflected from the primary is centered on the PSM image and is in focus. Now the two mirrors are concentric and located precisely to the optical bench datum indicated by the ball.
Once the Offner relay is aligned optically and located precisely to its mechanical structure via the tooling ball, light from an object on one side of the system axis of symmetry will be nearly perfectly imaged on the other side of the axis. The relay will have been optimized for a particular object distance off the axis but this distance is not highly critical to the relay performance. It is important to know exactly where the input is imaged on the other side of the axis. If a tooling ball is placed so that its center is at the center of the object field, the PSM can precisely determine where the image will be located by using the relay in double pass, see Fig. 8d. Light from the point source in the PSM is brought to focus by the PSM objective and sent on through the relay until it reflects off the center of the ball located with its center at the object plane of the relay. The light then retraces itself exactly back to the PSM focus where it is imaged by the CCD and its location shown on the video monitor. When the return spot is centered in the reference cross hair and is at best focus, the PSM focus is in focus at the center of the relay image plane. This check of object and image location also permits a double check that the alignment was done correctly, something that is always useful when the tolerances are tight.
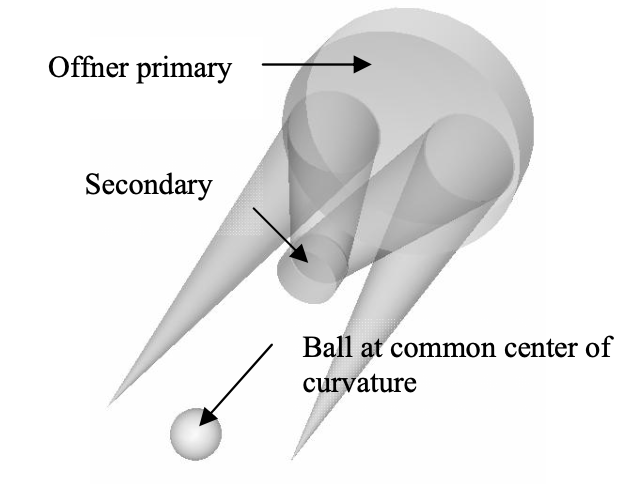
Fig. 8a Offner 1:1 relay wit ball at center of curvature
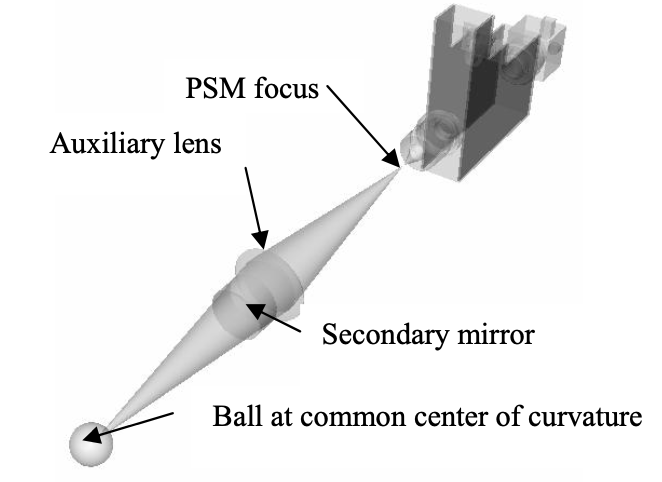
Fig. 8b Secondary aligned to PSM via auxiliar1y lens
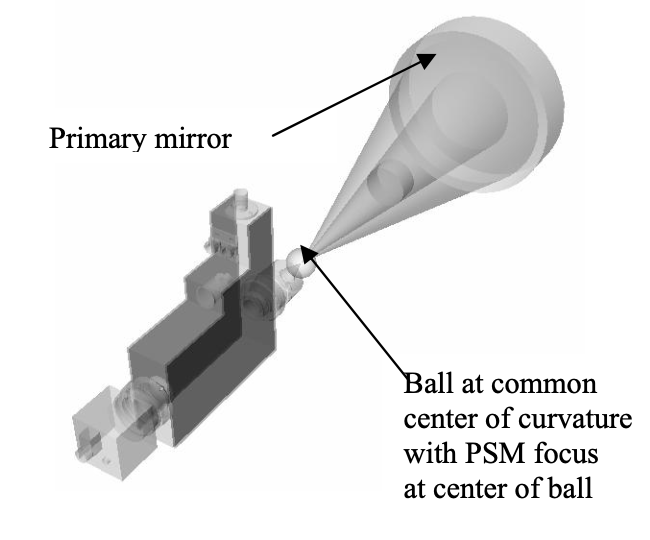
Fig. 8c Primary aligned directly to ball
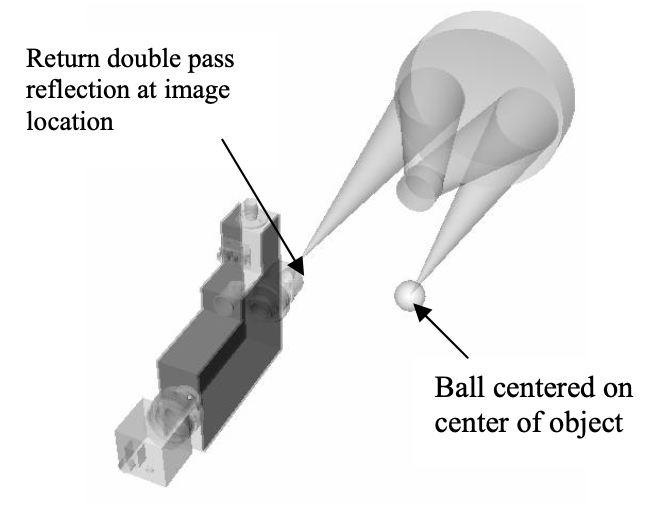
Fig. 8d PSM locating Offner center of image field
We conclude this example by saying the Offner 1:1 relay is the simplest sort of all reflecting, ring field microlithography optical systems. The all reflective systems that will be used to make future IC chips will contain six or more mirrors with their centers of curvature located along a common optical axis.10 If these systems are to meet their theoretical optical design performance, they will have to be assembled so their centers of curvature truly lie on the optical axis to 1 μm or better tolerances. Variations on the method described here will make this possible and avoid the inevitable tolerance stack up when optics are centered mechanically by their edges and seats.
3.4 Alignment of an off-axis telescope system
In this example we will describe two other modes of using the PSM for optical alignment and alignment of optics to mechanical datums. In practice, though not often thought of this way, all optical alignment deals with positioning optical surfaces in a particular relationship to mechanical datums as in the case of centering a single lens element. The optical axis is the line joining the centers of curvature of the two optical surfaces. Edging a lens is bringing its periphery, a mechanical datum, into concentricity with the optical axis. In this example, the telescope system is similar to the single element with the telescope itself being like one optical surface, the backend of the system like the second surface and the mounting plate for the system like the periphery of the lens. In this case, the periphery was established first and the two halves of the optical system each brought into alignment with the periphery or mounting plate. Figure 9 shows a simplified outline of the telescope system.
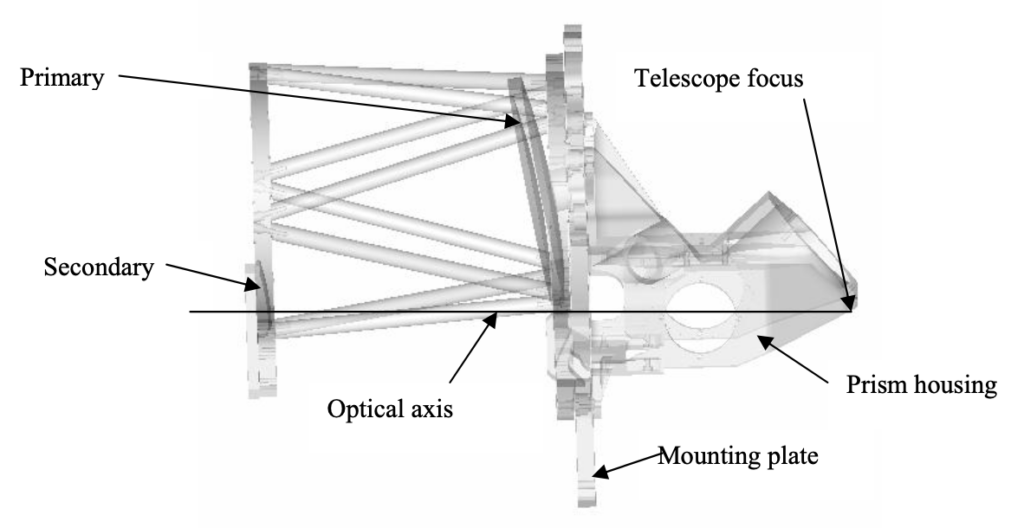
Fig. 9 Simplified view of the off-axis telescope system in the example
The telescope on the left of the mounting plate is an off-axis Ritchey-Chretien with an f/11 output as shown in Figure 9. The telescope and the prism housing are attached to the mounting plate by a three ball and groove kinematic mounting scheme, one coupling of which is shown in Fig. 10. Drilled balls fit into conical countersunk recesses in the telescope frame and prism housing. The two halves are pulled together by a screw through the center of the balls and are located by a pair of pins forming a double sided “V” groove in the mounting plate. In this way the two halves of the telescope are precisely located relative to each other and flexing of the mounting plate (by which the telescope assembly is held in its housing) will not disturb the alignment of the telescope system. Test fixtures for both sides of the telescope system used the same mounting scheme to accurately locate the halves during individual assembly and test.
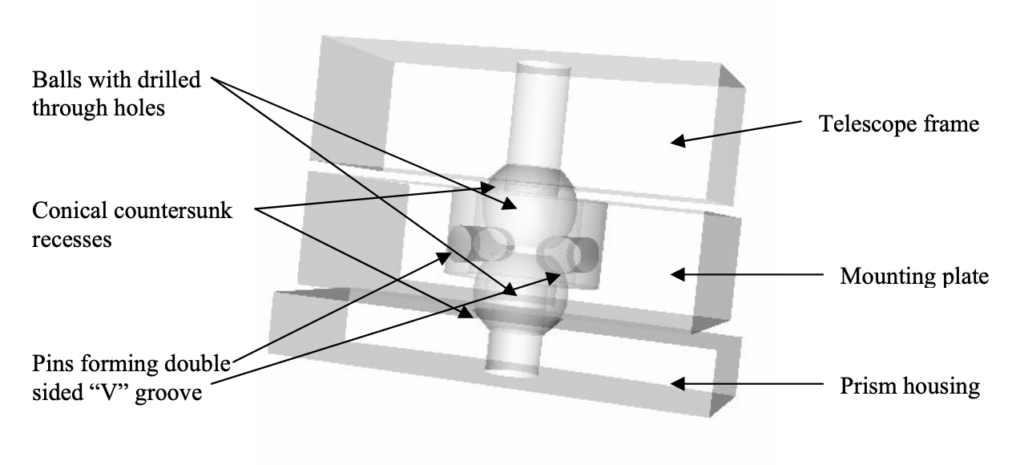
Fig. 10 Kinematic mount detail showing one mounting point with two pins forming a double sided “V” groove
3.4.1 Alignment of the telescope
By design the optical axis of the telescope was precisely defined relative to the telescope frame. The telescope frame, in turn, was precisely located relative to the optical table on which the telescope was aligned by means of a fixture incorporating the three ball kinematic mounting scheme as shown in Fig. 11. Two ends of the temporary long screws can be seen in the upper kinematic locators clamping the telescope frame to the test fixture.
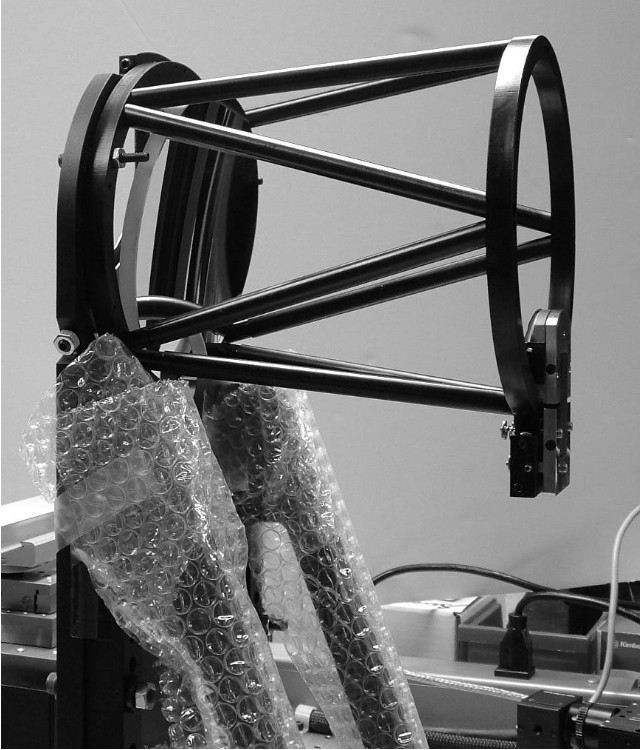
Fig. 11 Telescope frame held to the test fixture via kinematic mounts. The off-axis primary mirror is visible at the left end of the frame
Prior to aligning the telescope, the telescope alignment test fixture was adjusted in four degrees of freedom relative to the collimator; two degrees of tilt to make it square to the collimated beam and two degrees in translation to center the apertures. Then two balls were placed on the table relative to the test fixture and table so as to provide reference positions accessible to the PSM at the short focus of the hyperbolic primary and at the system focus. The line joining the centers of these balls defined the optical axis of the telescope mechanically
The telescope mirrors were then aligned in two steps against a collimator, first the primary alone and then the combination of primary and secondary. Initially the PSM was positioned so that it was looking into the center of the primary with its focus at the center of the ball at the primary focus. The collimator was then de-focused to produce a focus far behind the primary at the long focus of the hyperbolic primary. The source in the collimator also had to be raised precisely because the optical axis of the collimator and telescope were at known but different heights.
Once the PSM was aligned with the ball defining the location of the primary short focus, the ball was removed so the PSM could view the light from the collimator and focused by the primary. It was necessary to adjust the primary in five degrees of freedom, three to correctly position the focus and two to remove the aberrations caused by the primary optical axis not lying on the collimator axis. First the primary was adjusted so that light from the collimator and reflected by the primary was in focus and centered on the PSM crosshairs and in the computer monitor. This process aligned the first three degrees of freedom but the image showed substantial astigmatism, exactly what would be expected from a misaligned off-axis hyperbola.11 (It should be noted that since this was an off-axis telescope the aberration was largely astigmatism with a little coma and the two aberrations decreased together as the primary was aligned. Had this been a symmetrical telescope the only aberration seen due to misalignment would have been coma.)
The next step was to adjust the primary tilt and decenter to maintain the image centration and focus on the PSM crosshairs and to reduce the astigmatism. The most straight forward method of doing this is tilt and decenter sideways to straighten the astigmatic image so it is perpendicular to the optical table. Then adjust vertically relative to the table to reduce the length of the image until it is round and symmetrical. This procedure worked in a quick, directed fashion. The images observed with the PSM corresponded to the images in reference 11. Further, the PSM had sufficient magnification to view the “star” image to reduce the astigmatism to at least the tenth wave level. The star test is very sensitive to symmetry in the image and by going through focus the least astigmatism is very apparent.
Once the primary was adjusted so that it focused in the correct location and was free of aberrations indicating that its optical axis and the mechanical optical axis were coincident and parallel to the collimator axis, the PSM was mounted looking into the telescope centered on the secondary mirror aperture with its focus centered on the ball defining the system focus. Alignment of the secondary followed the same sequence as the primary but now the collimator was set at infinity focus with its source on axis. Fig. 12 shows this phase of the alignment with the PSM barely visible behind the telescope while the monitor shows the image from the telescope in the crosshair. The kinematic base at which the ball screwdriver is pointing accepts the posts (lying on their sides) that hold the balls that define the locations of the primary and secondary foci.
First the secondary mirror was adjusted in tilt and decenter so that the image was centered on the PSM crosshairs and was focused as well as could be determined given the residual astigmatism. Then the secondary was adjusted using a combination of tilt and decenter to reduce the astigmatism to give a well focused, symmetrical image while keeping the image centered on the PSM display crosshairs. Once this alignment had been performed we knew that the telescope focus was located the correct distance behind the test fixture and that the optical axis of the telescope as defined by the line between the primary focus and the telescope of secondary focus was perpendicular to the test fixture and correctly positioned relative to the three kinematic mounting locations on the test fixture.
The main difference between this telescope alignment technique and those described previously is that by using aberrations as well as locations, the PSM can monitor alignment in five degrees of freedom, something that would be impossible using an alignment telescope. Further, because the PSM operates with a relatively fast cone of light it is much less confusing than an alignment telescope in terms of selecting the reflection from the surface of interest. The alignment of telescope took less than a day and the secondary, which had more refined adjustments on the mount, took less than 1⁄2 hour including PSM setup time.
3.4.2 Alignment of the prisms in the prism housing
There were numerous prisms and fold mirrors in the prism housing to direct light from the telescope to various sensors as well as a path to direct light into the telescope and a path to couple a display into the eyepiece. All of these paths had to be boresighted so that as the operator changed from one mode of operation to another an object in the center of the field for one sensor remained centered for another. Further, it was desired that the prism housing and sensors be interchangeable with the telescopes so the center of the field had to be defined relative to a mechanical datum, namely the mounting plate coupling the telescope to the prism housing. To align these various paths two fixtures were used, a projector that produced a converging cone of light that matched the telescopes f/11 focus and a mounting fixture for the prism housing that exactly simulated the mounting plate. This approach is shown schematically in Fig. 13 where the ball in the foreground represents the projector source; the joined base of the cones represents a positive lens to produce the f/11 cone that ends with the far ball at the conjugate focus.
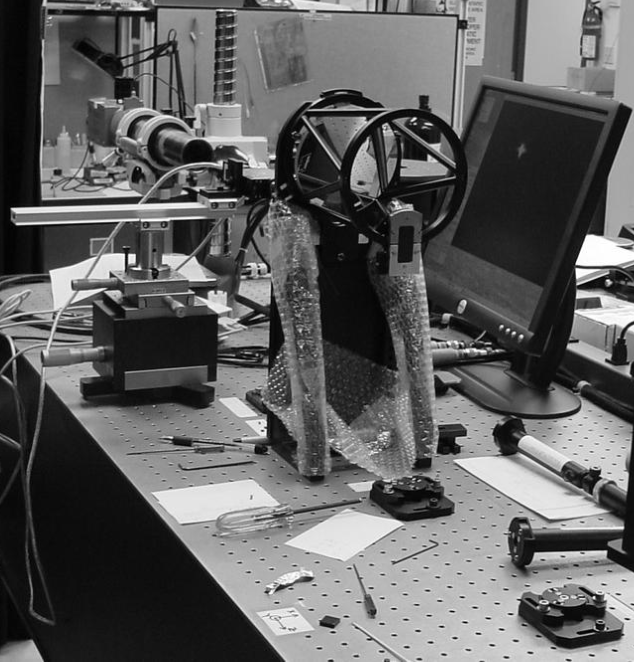
Fig. 12 Secondary mirror alignment phase with PSM behind the telescope, the image spot on the PSM computer monitor and kinematic locating bases for the posts (lying on their sides) and balls that define conjugate locations
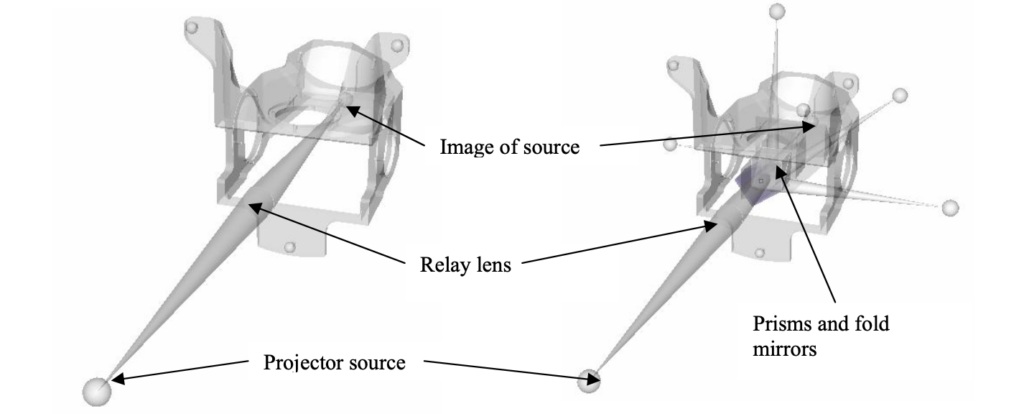
Fig. 13 Location of the source projector relative to the prism housing (left image)
Fig. 14 The various optical paths produced by the prisms in the housing with a ball centered at the focus of each (right image)
The three balls in the prism housing mate with the test fixture to hold the prism housing correctly in five degrees of freedom. Three degrees of freedom are controlled by the ball at the projector focus. The other two degrees of freedom control the location of the optical axis of the projector relative to the three balls defining the prism housing location. This is exactly the same condition that applied to the telescope so that when the two halves of the system are mated the telescope will focus at the far ball location and the telescope optical axis will be co-axial with the projector axis.
Figure 14 shows the prisms in the housing and the paths into which the prisms direct the beams. These beams need to be correctly positioned to a few pixels on each detector so the final alignment can be accomplished by a very slight lateral adjustment of the sensors themselves. To accomplish this, the test fixture that held the prism housing was drilled and bushings inserted directly beneath the foci of the various paths and rods of the correct lengths were cut to hold balls at the foci as shown in Fig. 15, a picture of the actual fixture set up for locating one of the paths.
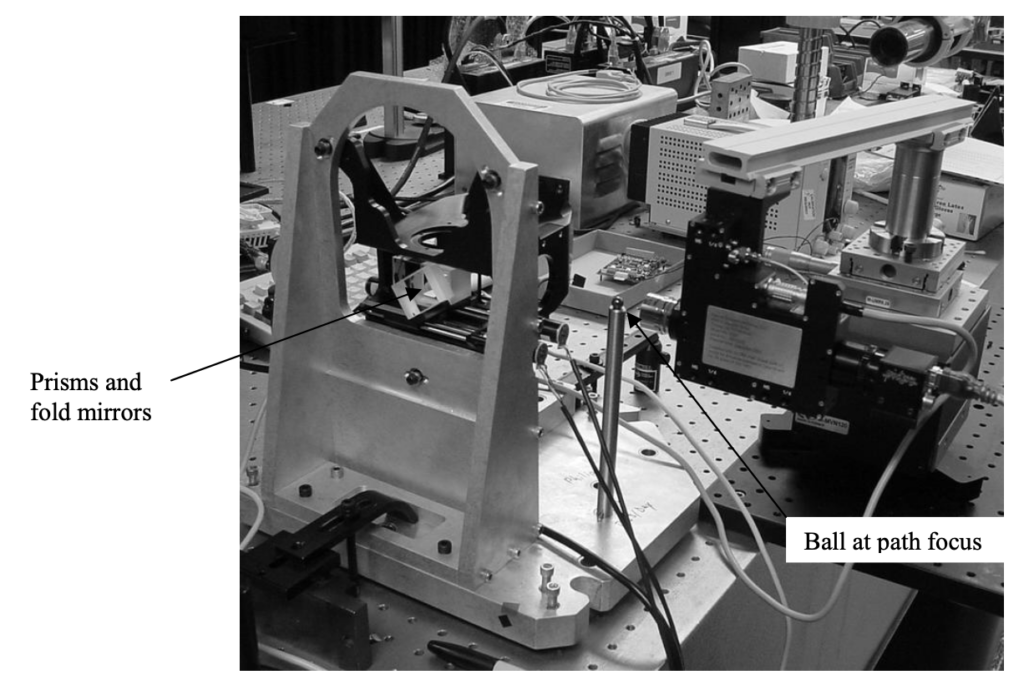
Fig. 15 Prism housing mounted to the test fixture with ball on metering rod to define the path focus and the PSM adjusted using the x-y-z stage so the its objective focus is at the center of the ball in the three translational degrees of freedom
Figure 15 is instructive in that it shows almost all of the elements of the alignment discussed to this point. The f/11 light cone is coming in from the left and going through the prism visible in the prism housing that is attached to the test fixture via the three kinematic locators clearly visible on the back of the fixture. A metering rod is located in one of the bushings and has a ball sitting on its top. The PSM is aligned pointing down the diverted beam path and the PSM objective focus is aligned to the center of the ball. The PSM is supported by a substantial x-y-z stage to facilitate its alignment with the ball center. The PSM tilt adjustments are relaxed because they only control vignetting.
The next step in the alignment of this beam path was to remove the ball and metering rod so light diverted by the prism could be viewed by the PSM. Crude adjustment of the prism was made with the projector source set at maximum intensity. The focus of the projected beam was easily visible on a card in front of the objective and the prism was tapped lightly to tilt the prism and bring the beam focus in front of the objective. Once the beam entered the objective the source intensity was reduced and the beam position monitored on the computer display. The real-time visual feedback of spot location and focus made positioning the prism straightforward and rapid. Another feature of the PSM allows left/right and up/down image flips so the displayed image always had the expected or natural orientation independent of mirror flips of the beam. This ergonomic feature make alignment easier because adjustments appear to work in the direction expected instead of the way they actually move.
Once the prism had been adjusted so the spot of light was positioned within tolerance, UV cement was carefully applied to several places along the edges of the prism and the prism tacked in place with a UV source. Once tacked and still properly aligned, epoxy cement was applied and allowed to cure slowly. The next prism in the chain was added, the proper metering rod located in the next bushed hole and the procedure repeated for the remaining prisms in the paths. The procedure for alignment of the six paths in the prism housing was so efficient that all the paths could be aligned in two hours. In addition to the time savings, the mechanical tolerances on the prisms and their holders did not have to be very tight. Ledges to guide the initial prism placement were all that was required. The balance of the alignment was done by slight taps and shimming to correctly position the prisms.
3.4.3 Alignment using the PSM mounted on a CMM
It should be noted that there is an analogous approach to aligning the prisms that has been very successfully used OPG on another off-axis optical system, that is to mount the PSM on the ram of a coordinate measuring machine (CMM) and use the CMM to position the PSM at the end of each path rather than use the fixture as we have just described12, 13. Generally the CMM approach is more effective when there are either only a few prototype systems or a variety of systems to align while the fixture method is more suited to production. The geometry and complexity of the system may influence the decision as to which approach would be best as well as the availability of a CMM.
Using the CMM eliminates two aspects of the fixture. Using the example of the prisms above, a source projector is still required but the location of the source focus and the position of the optical axis can be determined using the PSM and stored in the CMM. To accomplish this, the first step is to mount the PSM on the CMM ram in place of a touch tip probe and set the probe tip radius set to zero in the CMM software. Next the PSM objective is focused at the center of the CMM master ball and the coordinate system zeroed in all three directions simultaneously. Then the PSM is moved to the projector source and the PSM focus made coincident with the source focus. The coordinates of the source are noted. Then the PSM is moved to the image of the source and that location noted. This defines the five degrees of freedom of the source location as shown in Fig. 16, four degrees define the axis and one is the axial location of the focus.
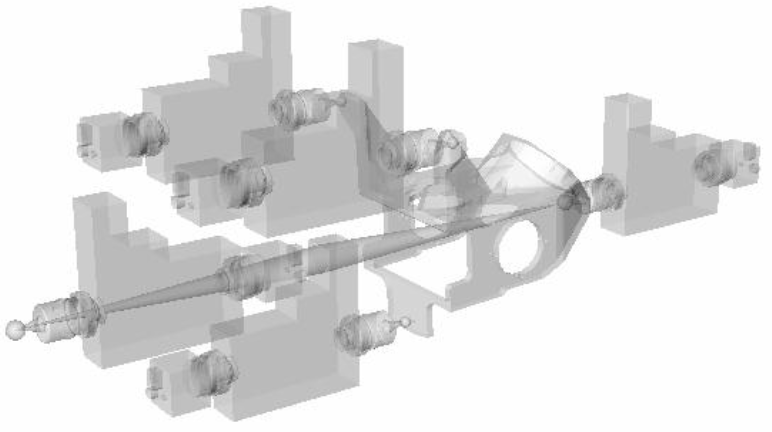
Fig. 16 PSM used in five positions on a CMM to locate the source projector axis and focus (2 – left facing), and prism housing (3 – right facing)
Now the PSM would be rotated 180 degrees about a vertical axis and the PSM focus zeroed again on the master ball. Then the locations of the three balls defining the location of the prism holder can be found, see Fig. 16. The telescope mechanical design defines where these three balls must be relative to the optical axis and focus of the source projector to be aligned. Using COTS alignment stages the prism housing can be brought into alignment with those three positions to locate it correctly relative to the source projector. Once the housing is correctly positioned, the PSM can be rotated to look down the first path to be aligned, zeroed again on the master ball and moved to the first path focus ready to sense the position of the first beam. The CMM software displays the global coordinates of PSM objective focus after each zeroing on the master ball. All that is necessary is to read from the design where the next focus is and move the PSM to that location and lock the CMM axis motions until the prism is aligned. Once the concept of using a CMM as an assembly tool is understood, the implementation is straight forward, and the CMM takes on added value as an assembly tool in addition to its traditional use as an inspection tool through use of the PSM.
Another way of aligning an optical system with powered elements on a CMM is to place the optical bench onto which the elements will be mounted on the CMM bed. Assuming provisions have been made in the opto-mechanical design, after zeroing the PSM on the CMM master ball, pick up three known tooling ball locations on the optical bench. Since these locations will be known by design relative to the optical axis and centers of curvature of the various optical elements, the PSM objective focus can be located precisely as each element is added. By picking up the three tooling balls on the optical bench, the CMM software establishes a coordinate system in the optical bench space and displays x- y-z coordinates in this space. When the first optical element is introduced the PSM can be located at the centers of curvature (or apparent centers of curvature) of the two surfaces. The element is then adjusted by tapping or shimming until it is correctly located within the given tolerances. Again, neither the element nor the holder need to be machined to tight tolerances because the element location can be adjusted far better using its optical axis, which is the line joining its centers of curvature. This alignment method largely eliminates tolerance stack up because the usual glass-metal (or optical-mechanical) interface features are not used to define optical alignment.
4. COMPARISON OF THE PSM WITH OTHER OPTICAL ALIGNMENT TOOLING
Now that various methods of using the PSM for the alignment of complex optical systems has been explained, we compare the features of the PSM with other more familiar optical alignment tooling. First, it should be said that the PSM is a compliment to existing tooling, not a replacement for it. For example, in Figs. 12 and 15 an alignment telescope is clearly visible. At the same time, there are other situations where it is very handy to have more than one PSM available.
4.1 Autocollimators
Although no examples have been given of the PSM used as an autocollimator, it is one if the objective is removed because the microscope is based on infinite conjugate optics. With the 100 mm tube lens and tenth pixel sensitivity, the PSM has angular sensitivity of about 5 seconds in reflection over a 6 mm beam diameter. While this is almost an order of magnitude worse than what can be achieved with a Davidson14 or Nikon15 autocollimator, there are situations where this electronic autocollimating capability is very useful, particularly in cramped locations and for use in conjunction with a CMM to move the PSM without pitch or yaw from interrogating one plane surface to another for parallelism.
An ergonomic feature of the PSM in this mode is the display on a computer monitor as opposed to looking through an eyepiece that might not be conveniently located. A very practical advantage of the PSM used as an autocollimator is that it is easy to align initially under normal lab lighting because of the bright laser source. With the more traditional autocollimators it is often difficult to find the return beam initially even if the lab lights are turned off.
4.2 Alignment telescopes
The PSM is probably most analogous to an alignment telescope in terms of what it does best but direct comparisons are difficult. A typical alignment telescope locates a line of sight to about 1 part in 800 of the full field at the object distance that the telescope is focused. This works out to roughly 5 seconds, the same as the PSM used as an autocollimator. The PSM has a minimum of 760 pixels across the field and is sensitive to 0.1 pixels when centered on a spherical surface and is thus about an order of magnitude more sensitive than the alignment telescope. The alignment telescope can bring objects on that line of sight into focus one after another as the focus is changed from near (about 16”) to infinity. This is very convenient when all the objects are in a line because no part of the test setup needs to be moved during the alignment. On the other hand, the alignment telescope is nearly useless if the objects needing alignment are in a three dimensional space such as the paths in the prism housing example or in aligning the components of a spectrometer.
The PSM is perhaps best thought of as a null or end point detector in three dimensions and it does this to about 1 μm laterally and a few μm axially. The ideal way to use the PSM is either mounted on the ram of a CMM where it can locate spherical and cylindrical features to better than the accuracy of most CMM’s over any reasonable distance, or in conjunction with a fixture like that described for aligning the prisms. In both cases, the PSM can locate centers of curvature and axes of cylinders to as well as or better than the mechanics of the CMM, or fixtures can establish the desired mechanical datums in three dimensional space. In this sense the PSM has a sensitivity of at least an order of magnitude better than an alignment telescope. Coupled with its small size, light weight, ability to be used as an autocollimator and ergonomically convenient to use display, the PSM can turn tedious assembly and alignment operations into rapid, accurate and easily documented procedures.
5. CONCLUSIONS
We have described the Point Source Microscope and illustrated its usefulness in the alignment of various optical systems by accurately linking mechanical datums to optically functional surfaces and these surfaces to each other. In comparison with other optical tooling, the PSM is a flexible compliment to, rather than replacement for, traditional autocollimators and alignment telescopes. A combination of the PSM’s accuracy and its use aligning the optically significant features of an opto-mechanical system make it possible to achieve higher alignment accuracy than attempting alignment via strictly mechanical features. This leads to systems with better optical performance than can presently be achieved at a reasonable cost.
With insight as to how the PSM works it is clear that the PSM, in a very practical sense, makes many alignment operations easier and quicker to perform to a higher level of accuracy, particularly for optical systems that are distributed in three, rather than two, dimensions, or do not have circular symmetry. Although difficult to document specifically, we have seen the time taken to align complex optical systems drop by a factor of ten while achieving better alignment than more traditional methods. Furthermore, by aligning using the optically functional surfaces of a system, both tolerance build up and the expense of precisely made parts can be largely eliminated.
6. ACKNOWLEDGEMENTS
The telescope referred to in Sec. 3.4 was a team effort of Breault Research Organization, Inc (BRO)16 and Optical Perspectives Group, LLC (OPG). The lead optical engineer on the project was Matthew Dubin of BRO who had many insightful and useful comments regarding the use of the PSM. OPG’s primary responsibility was assembly and test of the system that was performed at BRO with the able assistance of Joe Barcelo. The optical design of the telescope and sensor optics was performed by Richard Buchroeder of Optical Design Service under contract to BRO. The mechanical design of the telescope was done by Kris Tvedt of BRO. The details of the kinematic location features were due to Bryan Loucks, an opto-mechanical design consultant working with OPG.
7. REFERENCES
1 See www.rcopticalsystems.com/ionmill.html, for example
2 www.qedmrf.com/technology/tech.shtml
3 US Patent pending
5 www.nikon-instruments.jp/eng/page/products/list11.aspx
6 www.ptgrey.com/products/flea/index.html
7 sine.ni.com/nips/cds/view/p/lang/en/nid/12892
8 www.cerbec.com/TechInfo/TechSpec.asp
9 A. Offner, US Patent 3,748,015
10 D. M. Williamson, “Evolution of ring field systems in microlithography”, Proc. SPIE, 3482, 369-76, (1998).
11 R. E. Parks, “Alignment of off-axis conic mirrors”, Optical Fabrication and Testing Workshop Technical Notebook, OSA, Falmouth, MA Sept. 1980, pp. 139-45. Revised reprint available at www.optiper.com.
12 R. E. Parks and W. P. Kuhn, “Using a CMM for optical system assembly and alignment”, ASPE Proceedings Spring Topical Meeting on Coordinate Measuring Machines, 29, 3-8, (2003)
13 US Patent Application 20020054296
14 www.davidsonoptronics.com/catalog.htm
15 www.nikonusa.com/template.php?cat=3&grp=30&productNr=6B6D
USA

Innovations Foresight
4432 Mallard Point,
Columbus, IN 47201 USA
Telephone:
1-215-884-1101
Contact:
Customerservice@
All Asian Countries Except China

清 原 耕 輔 Kosuke Kiyohara
清原光学 営業部 Kiyohara Optics / Sales
+81-3-5918-8501
opg-sales@koptic.co.jp
Kiyohara Optics Inc.
3-28-10 Funado Itabashi-Ku Tokyo, Japan 174-0041
China

Langxin (Suzhou) Precision Optics Co., Ltd
1st floor, Building 10, Yisu Science and Technology Innovation Park, 100 meters west of the intersection of Xinhua Road and Weimeng Road, Kunshan City, Suzhou City, Jiangsu Province, 215345
Telephone: +860512-57284008
Contact: Wang Zengkun
+8617090133615
wangzengkun@langxinoptics.com
Copyright ©
Website by CS Design Studios
Headquarters: 7011 E Calle Tolosa, Tucson, AZ 85750
Laboratory: 1661 S Research Loop, Tucson, AZ 85710
